If you’ve ever dealt with water pooling around your foundation wall or unsightly gutter downspouts cluttering your lawn, it’s time to learn about downspout extensions. These essential drainage system components are designed to direct water from your gutter system safely away from your home’s foundation, preventing potential water damage and basement flooding.
What Are Downspout Extensions?
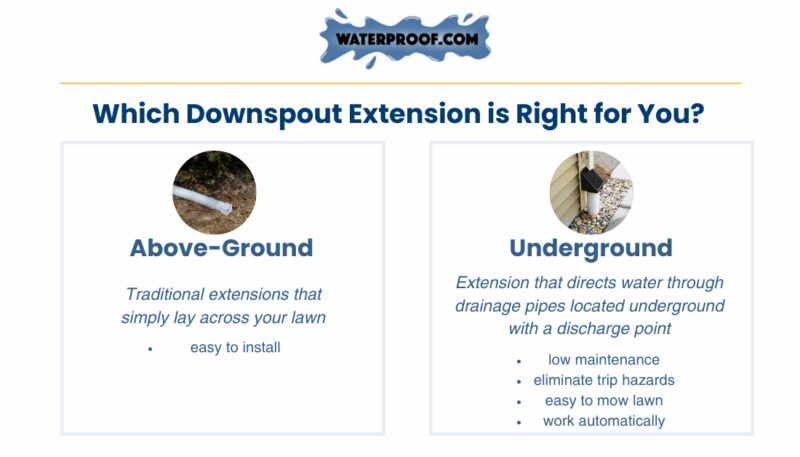
A downspout extension is an add-on component that connects to your existing gutter downspout, extending the path of water flow further away from your home’s foundation. They come in two main varieties:
- Above-ground extensions: Traditional extensions that lay across your lawn
- Underground extensions: Modern solutions that direct water through drainage pipes, featuring debris filters and pop-up emitters at the discharge point
The Importance of Good Drainage
When rainwater isn’t properly directed away from your home, it can lead to serious problems:
- Foundation damage from hydrostatic pressure
- Basement flooding and moisture issues
- Soil erosion around your home
- Landscape damage
- Ice hazards during winter months
Downspout Extension Installation Overview
The downspout extension installation is a moderately easy DIY project that typically takes 2-3 hours per downspout. For underground systems, you’ll need:
- Downspout extension kit
- 4-inch solid PVC pipe
- 4-inch 90-degree PVC elbow
- Shovel
- Tin snips
- Large tarp
- Gravel
- Basic measuring tools
Whether you choose an above-ground extension or underground drainage system, proper drainage is key to protecting your home’s foundation and maintaining a dry basement. The right downspout extender not only safeguards your home but can also enhance your property’s appearance by eliminating unsightly drainage solutions that interfere with lawn maintenance and landscaping.
How Downspout Extensions Work
Think of your gutter system as a water slide for your roof. Rain collects in the gutters, moves down the spout, and the extension moves it safely away from your home. Here’s how it all comes together:
Basic Setup:
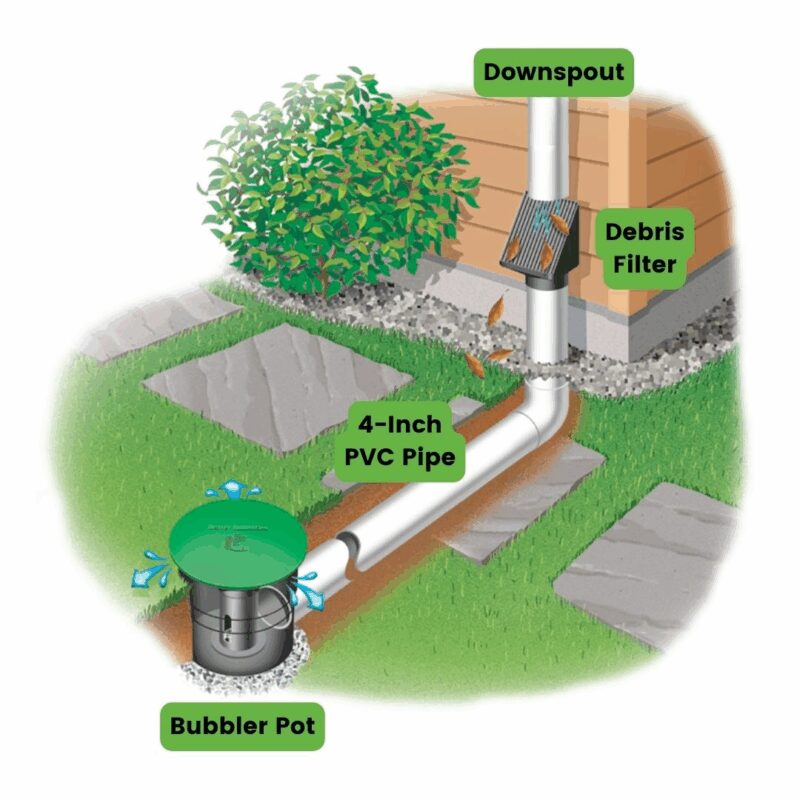
- A debris filter connects to your existing downspout, preventing leaves and twigs from entering the system.
- This connects to either an above-ground extension or an underground drainage pipe.
- Above-ground extensions are simple tubes that lay across your lawn.
- Underground systems utilize PVC pipe that connects to a special “bubbler pop” with a pop-up lid that releases water when full.
Underground Downspout Advantages:
- They operate low maintenance year-round.
- They eliminate trip hazards from exposed pipes.
- The system works automatically – as water fills the bubbler pot, the pop-up lid rises to release water flow away from your foundation.
- Any excess water naturally drains through the bottom of the pot.
Top Benefits of Installing a Downspout Extension
Installing a proper downspout extension system provides multiple important benefits for your home.
Protects Your Foundation:
- Prevents water damage around your home’s foundation
- Significantly reduces the risk of structural damage
- Helps avoid costly repairs down the line
Basement Flooding Prevention:
- Directs water away from your home’s perimeter
- Helps maintain a dry basement environment
- Reduces the likelihood of water seepage during heavy rainfall
- Especially important during storm events or snow melting periods
Saves Your Landscaping:
- Prevents concentrated water flow from downspouts causing soil erosion
- Protects plants from water damage
- Prevents unsightly mud spots in your yard
- Disperses water evenly and protects your landscape investments
Looks Better (Especially Underground Systems):
- Virtually invisible once installed
- Maintains your home’s curb appeal
- Allows for unobstructed lawn maintenance – you can even mow right over them
- Seamlessly integrates with your existing landscaping
- Attractive option for homeowners who value both function and appearance
Preparing for Downspout Installation
Planning Your Project
Before you start digging, it’s important to plan ahead:
Measuring and Marking:
- Be sure to call your local municipality to have them come out and mark any underground lines before starting your project.
- Start by measuring from your existing gutter downspout to determine where the extension will terminate.
- This should be at least 8 feet away from your home’s foundation to prevent water damage and soil erosion.
- Use marking paint or stakes to identify your installation path.
- Keep in mind any underground utilities or obstacles.
Calculating the Slope:
- Proper drainage requires a minimum pitch of 1/4 inch per foot of drainage pipe.
- For an 8-foot downspout extender, your trench should begin approximately 4 inches deep near the foundation wall.
- Slope down to about 8 inches deep at the termination point.
- This gradual slope ensures water flows efficiently away from your foundation.
Materials & Tools Checklist You’ll Need:
- 4-inch solid thinwall PVC pipe
- 4-inch 90-degree PVC elbow
- Underground downspout kit with debris filter
- Gravel for drainage
Safety and Tools
Having the right tools and safety equipment is crucial for a smooth installation process. Here’s what you’ll need:
Essential Tools:
- Shovel for trenching
- Tin snips for cutting downspout
- Measuring tape and level
- Marking paint or stakes
- Large tarp for containing dirt
Safety Equipment:
- Work gloves
- Safety glasses
- Steel-toed boots
- High-visibility vest if working near roadways
Before beginning, prepare your work site by clearing the installation area of any obstacles. Contact your local utility company to mark underground lines – this is a crucial safety step that’s often required by law. Lay out your tarp near the work area to collect excavated soil, making cleanup much easier once the project is complete.
Remember to keep the work area well-organized and maintain clear access to your tools throughout the installation process. This not only increases efficiency but also helps prevent accidents and ensures a professional-quality result.
How to Install a Downspout Extension: Step-by-Step
Above-Ground Installation
Installing a gutter downspout extension is a straightforward process that starts with precise measurements.
Preparation:
- Measure the area from your existing downspout to where you want to direct water (typically 4-6 feet away from your foundation)
- Using tin snips, cut your downspout at a 45-degree angle
- Make this cut approximately 12 inches above ground level to ensure proper drainage
Attachment:
- Slide the downspout extender over the cut downspout
- Ensure there’s a tight fit
- If needed, secure the connection using sheet metal screws on both sides
- The extension should slope away from your house at a rate of at least ¼ inch per foot
Securing and Testing:
- Secure the downspout extension using ground stakes or straps
- This prevents disconnection during heavy rainfall
- Test the installation by running water through your gutter system
- Check for any leaks at connection points
- Ensure water flows freely away from your foundation
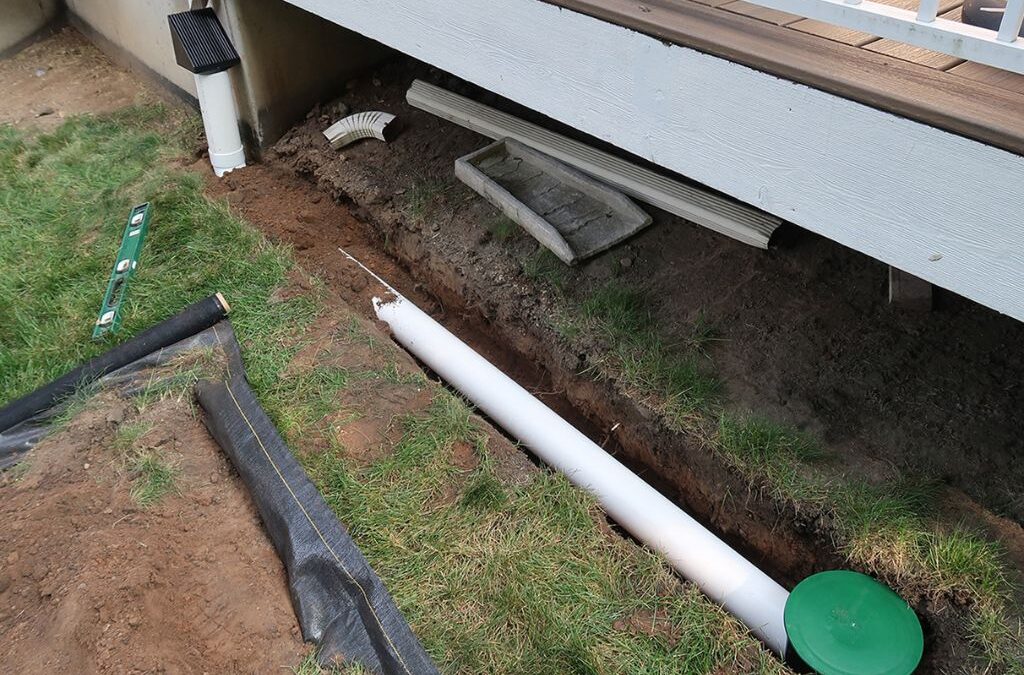
Underground Installation
Underground drainage system installation offers a more permanent and aesthetically pleasing solution.

Preparation and Trenching:
- Dig a trench from your downspout location extending at least 8 feet away from your foundation wall
- Make the trench 4 inches deep near the house, sloping to about 8 inches deep at the exit point
- Maintain a minimum grade of 1/8 inch per foot
Filter Installation:
- Install a debris filter at the top of the system
- Position the filter 10-20 inches above ground level
- The debris filter component prevents leaves and twigs from clogging the drainage pipe
- Connect the filter to your PVC pipe
Pipe and Emitter Installation:
- Lay the PVC pipe in the trench, connecting sections as needed
- At the discharge point, install the Bubbler Pop-up emitter
- The emitter will release water when the system fills, while smaller amounts of water in the Bubbler Pop-up will drain out the small hole in the bottom
- Position the top of the emitter’s green lid flush with the dirt line at the base of the grass
- Test the system by running water through it before backfilling to ensure the system is pitched correctly down toward the Bubbler Pop-up
Finishing the Installation:
- Carefully backfill the trench with soil
- Tamp down the soil every few inches to prevent erosion
- Replace any sod or seed the disturbed area
- Restore your lawn’s appearance
Ongoing Maintenance Tips to Keep it Flowing
Regular Maintenance
While downspout extensions are relatively low-maintenance, following regular maintenance will ensure they continue functioning effectively for years to come. A well-maintained drainage system protects your home’s foundation and prevents costly water damage.
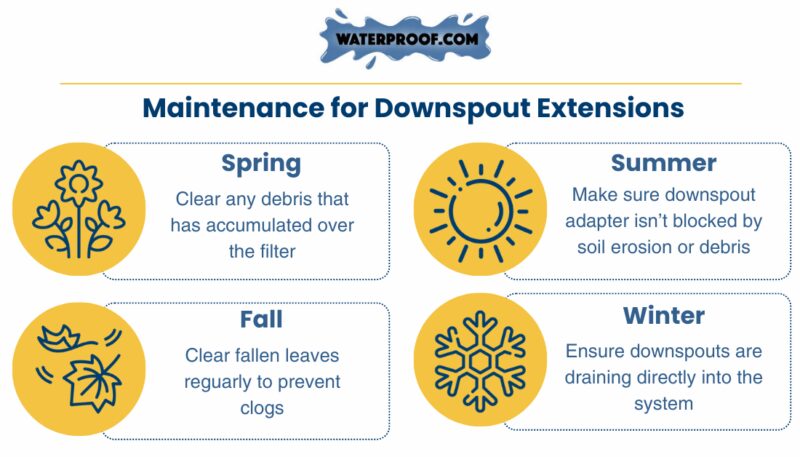
Seasonal Maintenance:
- Spring: Inspect the debris filter and clear any accumulated leaves or twigs that heavy rainfall may have deposited.
- Summer: Check that your downspout adapter is functioning properly and isn’t blocked by soil erosion or debris.
- Fall: Clean gutters and keep them free of large debris. Clear fallen leaves regularly to prevent clogs before winter arrives (this is crucial).
- Winter Preparation: Ensure your downspouts are draining directly into the system.
Winter Ready?:
- Gutter guards can help reduce debris that contributes to freezing blockages.
- However, gutter guards may not prevent ice dams during freezing weather.
Professional Support
While most homeowners can handle routine maintenance, certain situations call for professional installation expertise.
Contact a waterproofing specialist if you notice:
- Standing water around your foundation wall
- Structural damage in your basement walls
- Downspout extenders that aren’t functioning properly
For quality materials and professional-grade components, visit Waterproof.com for all your gutter downspout extension needs. Our underground downspout kits come with comprehensive warranties and are designed for easy installation and long-term durability. Each kit includes our patented debris filter, high-quality PVC pipe connections, and our innovative drain line system.
Remember, investing in proper drainage solutions today prevents costly repairs tomorrow. Visit Waterproof.com’s website or contact our expert team for additional resources, installation guides, and product recommendations tailored to your home’s specific needs.